Overview
You now have the option to use our CSV Uploader to easily import and store a CSV file in your Snowflake data warehouse. This feature allows you to conveniently upload a static dataset that is stored on your computer, and begin exploration data if your data is stored in a CSV file. This feature is useful if your data source is not supported by the Fivetran or Portable connectors, or if you have a sample dataset you would like to start exploring before syncing it using one of our connectors.
Uploading a CSV File
1. To begin the process of uploading a CSV file, you have two options. Both of these methods will allow you to initiate the CSV file upload process.
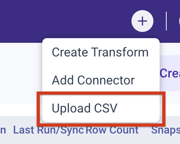
First, you can click on the "+" icon located within the app. From there, select "Upload CSV".
Alternatively, you can go to the Connectors page and choose "Upload CSV".

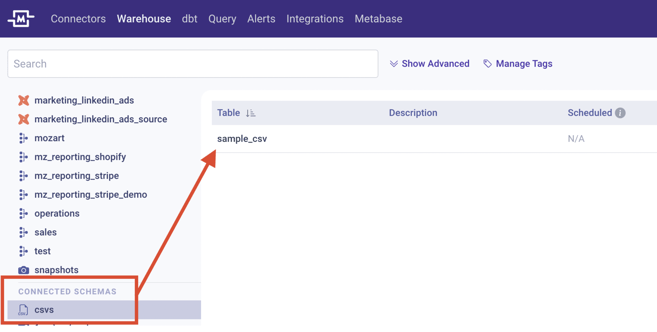
2. Choose the schema and type the table name where you want to save your CSV file. This will create a table with the specified schema and table name for your CSV file. By default, all CSV files will be stored in a schema called 'csvs' unless you specify at this step.

3. Click on the 'Select File' button to choose the CSV file that you wish to upload. Please note that you can only upload a single CSV file and create a single table at a time.
4. (Optional) Enter a description of the table that the CSV file will create.
5. Click on the 'Upload' button to begin uploading your CSV file to the data warehouse. This will take a few moments to process.
6. Once finished, you can locate the schema and table that were created from your CSV file on the Warehouse page. You can start querying this table!
Updating a CSV Table
If you have an updated file and need to make corresponding changes to the table, you can easily update it by replacing the existing CSV file with the new one under the same table name. This allows you to keep your data up to date and ensure any modifications or additions are reflected in your data warehouse.
There are two ways to update your file:
1. First, go to the Summary page of the CSV table and click on the 'Replace File' button to find the table from your computer. You can then click on the 'Select File' button and 'Replace' to proceed.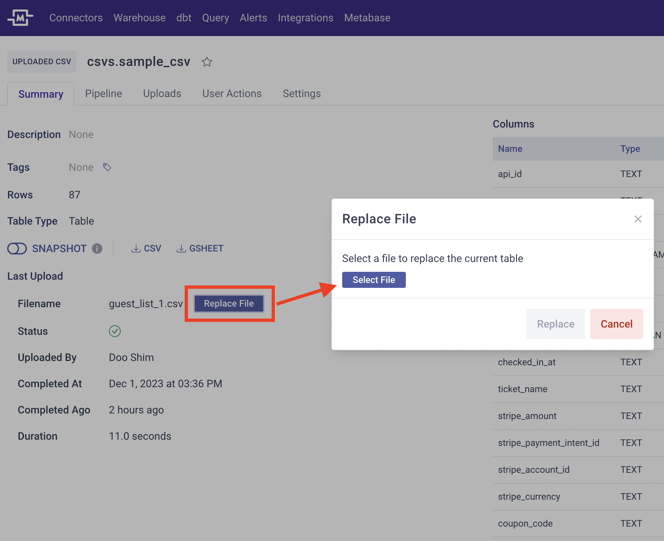
2. Alternatively, you can follow the Upload CSV process mentioned in step 1 from the previous section.
Use the same name you previously used for this CSV table. Make sure to check the box that says 'Replace table with this name that already exists' in order to proceed.

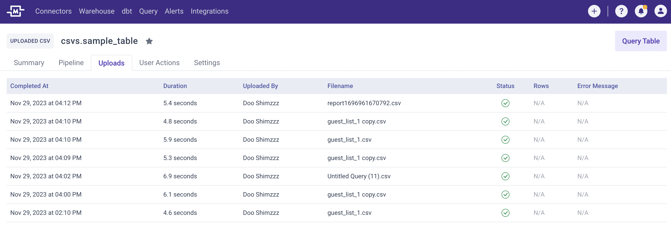
3. Click on the 'Upload' button to proceed with the update. You can navigate to the 'Uploads' tab to view a complete history of the updates (i.e. new uploads) that you have made to this table over time.
Additional Information on CSV Uploader
- Tables created using the CSV Uploader will not affect your MAR consumption. However, when you upload the CSV files using the CSV Uploader, Snowflake commands are executed and will consume some Snowflake computes in the process.
- The CSV tables can be used to query or create transforms just like any other tables. These tables will also appear as part of the upstream dependencies in your pipeline graphs.
- You can use the Snapshot feature on the CSV tables to capture historical records within the table. This allows you to keep track of changes and access previous versions of your CSV uploads.
- The time it takes to upload a CSV file using the CSV Uploader may vary depending on the file size. Generally, it can take a few seconds or up to 10 minutes.