Overview
As you begin to onboard more BI tools and data analysts to your team, it becomes apparent that each tool and user should have their own dedicated Snowflake account. This ensures that accounts are not shared across tools and users. In Mozart Data, you have the ability to create new Snowflake users for individual users and BI/external tool integrations.
There are three different roles that users can be assigned in Snowflake: mozart_admin, mozart_editor, or mozart_viewer (See each role and permissions here). These roles determine what actions users can take within the Snowflake database, such as creating tables or editing transforms. Anyone with a Mozart Data account can generate new Snowflake accounts.
Let's Get Started!
To create a new Snowflake user account in Mozart Data, follow these steps:
1. Navigate to the Integrations page in Mozart Data.
2. Choose Snowflake or any other BI/external tool you want to create a Snowflake user account for.
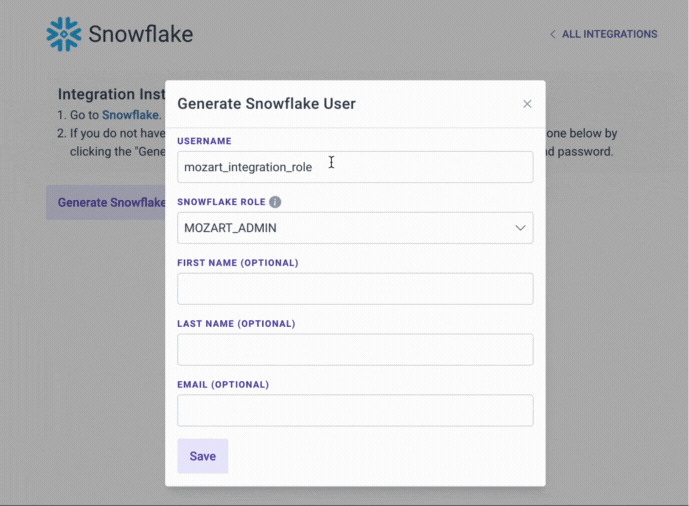
3. Click on the 'Generate Snowflake User' option.
4. Enter the username using the following format: company_name + tool + role (e.g. mozartdata_mode_viewer).
5. Assign a role to the user and click Save.
Remember to save the new Snowflake username and password securely, such as in a password manager like 1Password. If you forget the password and need it later, you will not be able to access it again and will have to reset the password in Snowflake.
Snowflake User Roles
|
|
mozart_admin | mozart_editor | mozart_viewer |
| View Tables | ✅ | ✅ | ✅ |
| Run Queries | ✅ | ✅ | ✅ |
| Create Transforms | ✅ | ✅ | ❌ |
| Edit Transforms | ✅ | ✅ | ❌ |
| Delete Transforms | ✅ | ✅ | ❌ |
| Create New Snowflake Roles (in Snowflake) | ✅ | ❌ | ❌ |
| Grant Access to Schemas / Tables / Roles to Other roles or Users (in Snowflake) | ✅ | ❌ | ❌ |